hi there!

I’m Mari.
On Marivelous Me! you’ll find recipes, food gifts, food I’ve traveled for and food solutions. Poke around, maybe you’ll find inspiration for something you’re working on. Enjoy! 

recipes

Entries by Mari (249)

Monday
May202013

Mochi, The Medium For Another Wacky Project


My good friend Joy’s birthday was this past weekend and I wanted to make something for her. She’s witnessed and sampled a few of my hairbrained ideas over the years but none were specifically for her. Well, lucky for her she’s just a few miles down the road now and lucky for me, she’s not too hard to gift - especially when it comes to making things that are sweet.

Click to read more ...

Friday
May172013

Bartending School and the Task of Memorizing

For the past month, I’ve been taking a course at the National Bartenders Bartending School to learn, that’s right - how to be a bartender. We not only learn how to make over 150 drinks (from a Dry Manhattan to a Woo Woo) but we also learn drink terminology; different liquor categories, their origins, flavors and production methods; some trivia alongside some dram (liquor) laws; and bartending etiquette. In the end, to be certified, there is a 100 question written exam you have to pass before being allowed to take the examiner’s choice of ‘make twelve drinks in seven minutes’ practical exam.

On the plus side, I’m already familiar with a lot of different brands of alcohol, their categories, flavors and origin (ex: Kirin: beer, Japan; Ciroc: vodka, France, distilled 5 times) and have been able to make some combination of drinks in less than seven minutes. On the down side, other than having to take my drivers’ test last month, the last time I had to memorize anything for an exam was probably when I took art history at Parsons, twenty years ago. Yeah, you can say my memorization skills are a little lot rusty. 

The course itself only lasted two weeks but I've been studying and practicing for the past two weeks almost daily. So today, I’m attempting the written exam. If I pass, I’ll take the practical too. Fingers crossed - I’ll let you know the outcome next week. ‘Til then, with a fried brain and butterflies in my stomach, I wish you a Happy Weekend! 

Thursday
May162013

Mugicha - Japanese Iced Tea

When I was a kid, one of the staple summer beverages we’d have in the fridge was mugicha - a roasted barley tea or tisane. It’s caffeine-free, a little nutty in flavor and definitely has a roasted vibe. Mom would take a couple sachets, add it to some boiling water, let it steep for a few minutes and then add equal parts cold water to take the heat down. Japanese style iced tea in minutes.

Now that it’s starting to heat up here, I need to keep some thirst quenching, cold beverages on hand. One of the first things that popped into my head was, you guessed it - mugicha! To take advantage of our sunny locale, instead of starting with hot water, I made sun tea. By letting the sun’s heat do the work for me, the tea stayed clear and there was zero bitterness.

I can imagine adding some agave or maybe some orange simple syrup to sweeten it up but it’s great on its own. Tastes like summer in a glass. Now where's that sprinkler... ?

MUGICHA
Makes 2 quart 

2-quarts (8 cups) water
2 sachets mugicha 

Add water and mugicha sachets to a clear glass container or pitcher. Let steep in direct sun for two hours. Stir and remove sachets. Pour mugicha over ice. Enjoy! 

Wednesday
May152013

Dominique Ansel's Cronuts

When Mr. Mari and I went to Chicago for our eating trip, we ate - or tried to eat 17 donuts - in two days. That’s right. Do-Rite Donuts, The Doughnut Vault and Glazed & Infused were where we stopped to indulge, scratch that - gorge on - some fried, sweet dough. However, had Dominique Ansel started making his cronuts (half croissant/half donut) back then, I may never have gotten on that plane and stuffed my face silly in the Mid West. Leave it to a Frenchman to up an American classic.

(News bite and candied rose/vanilla cream filled cronut image via Thrillist; crumb topped cronut image via Dominique Ansel)

Tuesday
May142013

Watermelon Margaritas - ¡Muy Refrescante! 

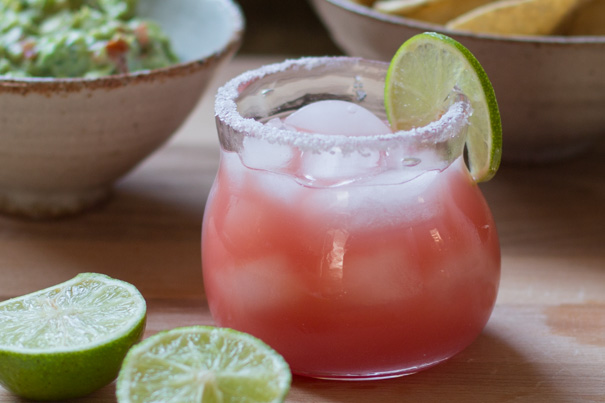
Last week, Hilary and Will, two of our good friends from New York were in town. They wanted to see our place before heading to dinner so of course I needed to make a snack. Having just come off of my avocado high, I thought it only appropriate to make guacamole for them. We needed something to drink too so how about some watermelon margaritas? Exactly. 

I took advantage of the simple syrups I made from my wacky candied fruit project but for this recipe I included an easy and clean tasting simple syrup. It makes more than you need for the recipe but depending on how many rounds you’re drinking or serving, you may need to double the syrup! You'll also have to add more or less simple syrup depending on the sweetness of your watermelon. I strained the blended watermelon juice but you don’t have to, but by taking out the blended seeds, which add bitterness, I think makes the drink that much better.

WATERMELON MARGARITAS
Makes 4 servings

1/2-cup sugar
1/2-cup water
Zest from one orange
Zest from one lime
1/2 small seedless watermelon, chilled
2-3 limes, juiced (about 1/2 cup) + 1 for garnish
4 ounces Herradura Blanco or any unaged tequila
2 ounces Combier L’Original or triple sec
Coarse salt, optional for garnish

In a small saucepan, heat the sugar, water, orange and lime zests over medium high heat. As it starts to boil, wash down the sides of the pan with a clean, water-wet pastry brush. Bring to a boil; reduce heat to medium and cook for 3 minutes. Remove from heat and cool to room temperature. 

While the simple syrup is cooling, remove the rind from your watermelon and cut into one-inch pieces. In batches, blend pieces in a blender until smooth. Line a strainer with some cheesecloth and strain the liquid into a pitcher. When it stops dripping, toss the remnants, rinse the cheesecloth and repeat if necessary.

Strain the simple syrup and press on the zest to extract as much of the flavor as possible.

Add the lime juice to the pitcher; stir with a wooden spoon. Add 3 tablespoons of simple syrup. Taste and adjust syrup to your liking. Put it in the fridge until you’re ready to serve. Slice the remaining lime (zest’s still attached!) into 1/8-inch slices. Cut through the rind on one spot. Set aside.

For salt rimmed glasses:
Pour a teaspoon simple syrup into a small dish. Add a teaspoon of water and stir to combine. In another small dish, add some coarse salt. Take a glass and dip it into the simple syrup dish. Let any extra drip off and then dip the glass into the coarse salt dish. Tamp the side so any excess salt falls off. 

Fill glass with ice. Add one ounce of Herradura Blanco and 1/2-ounce of Combier L’Original. Top with watermelon juice. Add a lime wheel garnish. Make the other three and enjoy!

Note: You can easily make this into a non-alcoholic refresher. Simply omit the tequila and triple sec. Fill the glass with ice, 2/3-full of watermelon juice and top it with some soda water. Add a lime wheel garnish, presto! Muy refrescante! 

Monday
May132013

Tip: Professional-izing a Homemade Cake

When gifting a homemade cake, there are a couple things you can do to make it look a little more professional…

Forget the lacy doily and use a metallic cake board instead. Cake boards are clean looking, sturdy and a little dressy. The gold or silver edge that peeks out from under your cake adds just a touch of sparkle - dressing up your cake without taking away from your masterpiece. You'll need to scratch up the surface of the gold paper so the cardboard you have under your cake has something to adhere to when glued. The gold surface is too slickery to just place the cake on top. The last thing you want is for your beautifully decorated cake to get its frosting smushed to the side of the cake box if it's tilted. Disaster! Squirt some Elmer’s Glue onto the gold, keeping away from the edge and place your cake on top. Traditionally, one would have about 1/2 to 1-inch border all around the cake but I like that there's only a little peeking out from under this cake. 

Like what baseboards do for drywall and floors, adding a little ribbon trim (or piped icing) does for cake and board: it hides the gap. Pick a color that compliments your cake and gently press it to the sides. If your cake is covered in buttercream, the ribbon will stick really well but if you use satin ribbon, it will wet the ribbon so be sure to adhere the ribbon completely.

Lastly, put your awesome cake in a bakery box. Let them wait for the reveal! 

Easy peasy "professional".

Friday
May102013

Mother's Day Flowers

Now that it’s officially spring, there are a ton of blooming plants and trees in my neighborhood. When I run outside I notice a new array of brilliant colors on one block, Dr. Seuss-like plants I’ve never seen before on another and the amazingly heady scent of jasmine, lilac and other things I don’t recognize but smell amazing everywhere. I thought about sending my mom some cuttings from here for Mother’s Day but the risk of being arrested for trespassing prevented me from following through with the idea. Instead, she’s getting an arrangement from a local florist in her town (Surprise!) and these photos so she can imagine what it would be like to walk around my neighborhood with me. I love you, Mom. I hope you’re having a wonderful day. You deserve it.

To all the Mom’s out there, have a marivelous Mother’s Day! It’s your day to be showered with the love you’ve been showering on everyone else all year long.

Thursday
May092013

A Princess Cake For My Prince Charming

Like most couples that are first dating, Mr. Mari and I asked each other a bajillion questions: What’s your favorite movie? Where did you grow up? What’s your favorite dessert? Well, when Mr. Mari responded to the last question with ‘Princess Cake’, I just stared at him. What? What the hell’s a Princess Cake? I knew he was a Disney fan but really? A Princess Cake? He obviously had to explain.

Click to read more ...